![]()
![]()
![]()
Example Workflow: Building an RFA Checklist
Understanding the Challenge
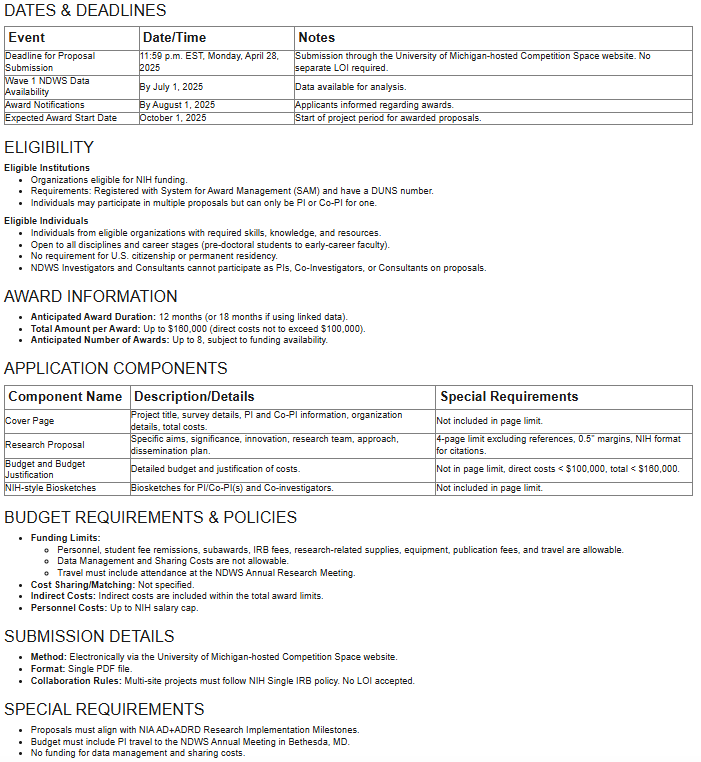
Research Funding Announcements (RFAs) present a common challenge for research administrators. While they contain critical information about deadlines, eligibility requirements, award details, and application components, this information is rarely organized consistently across different funding agencies.
This is where Vandalizer truly shines. Let’s walk through creating a workflow that transforms varied RFA documents into standardized, actionable checklists that your team can rely on.
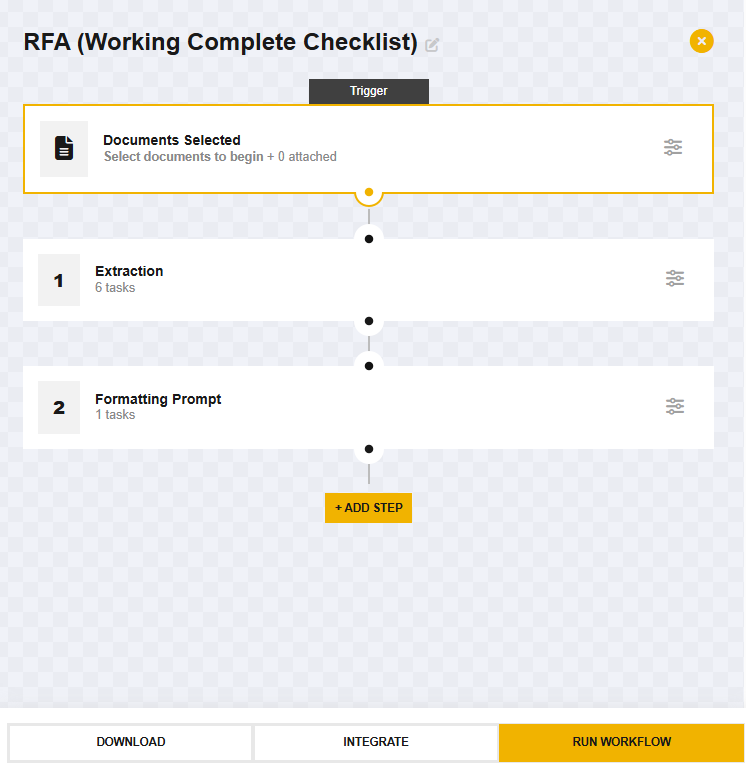
Creating Your RFA Checklist Workflow
Step 1: Design Your Tasks
For an effective RFA checklist, you’ll need to create two types of tasks:
- Six Parallel Prompt Tasks - These tasks will identify and pull out specific categories of information from the RFA document regardless of where it appears or how it’s labeled. You’ll create separate prompt tasks for:
- Dates & Deadlines
- Eligibility Requirements
- Award Information
- Application Components
- Budget Requirements & Policies
- Submission Details
- Formatting Prompt Task - This task will organize and consolidate all the information gathered by the six prompt tasks into a clean, standardized checklist format.
Click the Tasks button on the bottom right and then click the +NEW TASK button. Select Prompt from the options and type in your prompt. Repeat these steps for all 6 prompt tasks and then the formatting prompt.
Step 2: Build Your Workflow
Navigate to the Workflows tab in the Toolbox window and click on the +New Workflow button. Then, click on the Add Step button.
Now click on the Add your first task button, click Prompts, and select your previously created prompt task. Repeat these steps to add the other 5 prompt tasks (In the same step).
The parallel prompt task approach is particularly effective for RFAs because it allows each task to specialize in finding a specific type of information, even when that information is scattered throughout the document or described using different terminology across funding agencies.
Now add a new step and add the formatting prompt task in that new step.
Step 3: Run Your Workflow
With your workflow built, you’re ready to put it to work:
- Make sure your RFA document is selected in the Document Viewer
- Click the Run Workflow button in the bottom right corner of the Toolbox window
- Watch as Vandalizer processes each step, first running all six prompt tasks in parallel and then formatting the combined results into your checklist
The result? A comprehensive, well-organized checklist containing all the critical information from the RFA, presented in a consistent format regardless of how the original document was structured.

Step 4: Reuse With Future RFAs
The real power of this workflow is its reusability. The next time you receive an RFA:
- Upload the new document
- Select your saved “RFA Checklist Builder” workflow
- Run the workflow with a single click
Other Workflow Ideas
- NSF award notice Extraction. Using an extract task important information from an award letter such as PI, dates, or total budget can be extracted. Because NSF award notices use a standard format an extraction task is a better choice than a prompt task.